How to set up WSJT-X for FT8
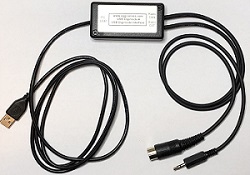
This page is for Hams looking to set up FT8 & WSJT-X. I have based around using our popular Digimode-4 interfaces. The interface has a dedicated built-in USB sound card to free up your PCs internal card for normal Windows duties, it has full audio isolation and gives you full CAT control of your radio.
Our Digimode-4 interface used exclusively in this setup guide is available from our Icom, Kenwood, Xiegu and Yaesu shop pages.
However, you can use the settings as a guide to get going with any interface by changing COMM port drivers, audio settings etc.
I am also going to make some assumptions here that you can find your way around your PC settings to get to Windows Device Manger, the Sound Control Panel etc. This is a guide to setting up WSJT-X and not a Windows features instruction.
Section 1 - Introduction (or let's get the boring technical bit out of the way first)
Let is first get to grips with what WSJT-X (and its sibling MAP65) is and to do this, I will steal the description below from the WSJT Home page:
"WSJT-X and MAP65 are open-source programs designed for weak-signal digital communication by amateur radio. Normal usage requires a standard SSB transceiver and a personal computer with soundcard, or the equivalent. SDR-style hardware including the SDR-IQ, Perseus, SoftRock, and FUNcube Dongle is supported by MAP65. All of the programs are available free of charge, licensed under the GNU General Public License. Installation packages for WSJT-X are available for Windows, Linux, and OS X, and MAP65 is Windows only.
WSJT-X ("Weak Signal Communication, by K1JT") offers specific digital protocols optimized for EME (moonbounce), meteor scatter, and ionospheric scatter, at VHF/UHF, as well as for LF, MF, and HF propagation. The program can decode fraction-of-a-second signals reflected from ionized meteor trails and steady signals more than 10 dB below the audible threshold. WSJT-X incorporates nearly all popular capabilities of the former programs WSJT and WSPR, while adding comprehensive rig control and many other features. Check the WSJT-X page and links therein for details about modes FT4, FT8, FST4, FST4S, JT4, JT9, JT65, Q65, MSK144, and WSPR. "
Now we have that bit out of the way, let's explore some of the finer details and what is required in the way of hardware and software to operate modes supported by WSJT-X the most popular being FT8.
- Modes supported by WSJT-X are AFSK modes and you need some hardware to interface your PCs sound card to your radio via its accessory/data port to get to the Tx and Rx audio signals plus your transceivers PTT line.
WSJT-X also allows for CAT control of your transceiver so that it can set and get the frequency and mode of operation. However, you can choose not to use the CAT functionality. At www.xggcomms.com we offer a wide range of interfaces supporting WSJT-X and this guide will be based on our popular Digimode-4-USB which offers an external fully isolated USB Sound Card with built in CAT control.
- WSJT-X like all other Digital modes (irrespective of band) uses Upper Side Band (USB).
- WSJT-X is based around narrow band modes. FT8 for example is 8 individual carriers each separated by 6.25Hz. The whole FT8 spectrum fits in a 50Hz bandwidth. Only 77 bits of information are sent in a 15 second long transmit window (13 text characters) so data rate of FT8 is just 6.09 bits per second. When you tune your radio into let's say the FT8 frequency on 40m (7.074MHz), your receiver is receiving circa 3kHz of audio bandwidth. You can fit a lot of 50Hz wide FT8 signals into this space. The WSJT-X software uses the power of Digital Signal Processing (DSP) via the PC Sound card to tune into the narrow FT8 signal you are interested in.
- Modes such as FT8 uses alternating time slots for transmit/receive sequences. In the case of FT8, the time slots are 15 seconds long. Actually, the active data time is 12.64 seconds and then 2.36 seconds is left for your PC to fully decode the signal. The software will listen/decode for 15 seconds and then transmit for 15 seconds. This brings me to the first bit of software you need even before WSJT-X. This will need to continually synchronize your PC clock to NTP time so that everyone is aligned to the 15 second transmit receive boundaries. We will look at this software in a later section. When you click on a signal to decode in the WSJT-X waterfall display, the software will set your transmission to be in the 15 second time slot when the other station has dropped to receive.
- Because modes such as FT8 are multi-carrier, it is important not to over-drive your PA otherwise you cause intermodulation. This will distort your transmitted signal making it harder to decode especially when your signal is weak at the receive site. Of course, if you really overdrive your PA, then your signal will be too wide and you will not be popular with operators adjacent to you in the band.
Section 2 - Let's download/install some software, plug in the interface and carry out some initial checks
- Install and set-up Dimension 4 NTP Software
We need to get some software to keep your PCs clock aligned to NTP so that you are synchronised to the transmit/receive time slots. There are numerous applications to which will poll remote NTP server to discipline your PC clock but simplicity, I would recommend using Dimension 4. It can be downloaded from here: Dimension 4 Download
When downloaded, run the installation executable and accept the usual destination folders, licence conditions etc and allow the software to install. You may get a Windows User Account permission window pop up and so click allow to continue the installation.
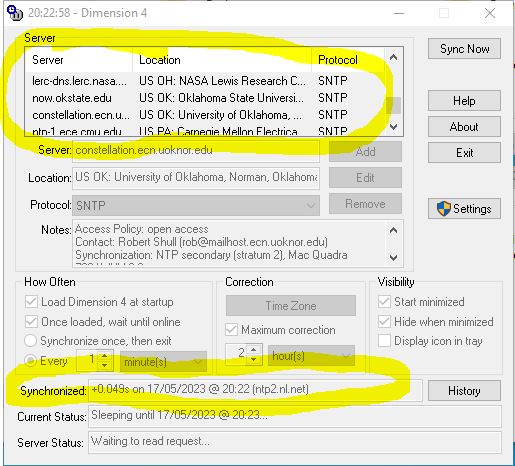
When you run Dimension 4 from " Windows Start" it will likely ask you to "Start the Dimension 4 service". Dimension 4 runs a continual service in the background continually adjusting your PC Time to align with NTP. Click on "Allow" for the service to run and any other pop-up permissions. Finally, the Dimension 4 window will pop up showing the default NTP servers it will access and various settings on how often it will poll etc. You can leave these as defaults. As "Load Dimension 4 at startup" is checked as an option, from now on, it will run every time you power up your PC and periodically correct the clock.
You will see that Dimension 4 is working OK as you will see regular updates in the "Synchronized" box as to how far out the clock is and when the update occurred. As below.
- Install and set-up FTDI Comm port drivers
Next for the Digimode-4 we need to load the USB COMM port drivers. This is so the PC can control the radios frequency and mode via the CAT port and, if you choose to, use the hardware PTT signal so WSJT-X can put the radio to transmit. It is worth mentioning here that many radios also accept PTT over the CAT commands. Our recommendation is to use hardware PTT and not CAT PTT.
Our interfaces use the highly reliable FTDI chipset and the drivers may not be native in your OS. At this point, your installation may vary depending on if you are using Windows, MacOS or Linux. I will assume Windows for these instructions.
You can grab the Windows drivers from here: FTDI Drivers
This will download a zip file to your Downloads folder called "CDM212364_Setup.zip" or similar. The version number may change over time. If you double click on the .zip file, Windows will open it and enclosed within is the setup.exe. Double click on this to install the latest version of the drivers. You will likely get the usual Windows message asking you if you want the installation to make changes etc and so accept this pop-up.
A FTDI CDM Divers window will pop up asking you to "Extract" the drivers. Click on the "Extract" button. This will bring up the Installation wizard so click "Next" and then accept the license agreement on the next pop-up. Again, click "Next". The Drivers will install and so you can then click "Finish" on the final page. You are done. FTDI Drivers are installed.
- Connect the interface, check that it is seen by the PC and find out the Comm port number
Now you can plug your Digimode-4 interface into a free USB port on your PC. You may here some usual information sounds from the Windows sound system as it registers the various devices on the interface. The Digimode-4 has a built-in USB hub to allow both the FTDI Comm port and the built in USB Sound Card to be visible to the PC. Both the USB Hub chip and the C-Media USB sound card in the Digimode-4 have generic Drivers built into Windows and other OS's.
In the Windows task bar search box, type "Device Manager". From the search pop-up, run the Device Manager application.
First, let's look in the "Sound, Video and game controllers" section. As seen in the image below, you will see a "USB Audio Device" in the list. Remember this name as you will need to select this as your sound card in the WSJT-X audio settings.

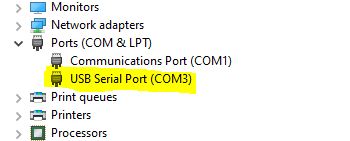
Whilst still in Device Manager, let's look in the "Ports (COM & LPT)" section. You should now see a new "USB Serial Port (COMx)". Make a note of this number as you will need it in the WSJT-X CAT settings. In the instance below, my interface inherited COM3.
If you have more than one USB Serial device attached and are unsure which one is the Digimode or CAT interface, unplug it and the devices will refresh. The one that vanished was the one belonging to the interface.
Section 3 - Let's get WSJT-X installed and setup
- Download the install WSJT-X
WSJT-X can be downloaded and installed from this link: WSJT-X Download Page
From this installation page you can download the latest releases for your OS. It is available for Windows, MacOS and various flavours of Linux. I will cover the Windows installation here.
Run the downloaded WSJT-X setup .exe file. You will get a pop-up asking if you are happy for the installation to make changes to your device so accept this prompt. The main Setup window will pop up so click on "Next>". At the Licence Agreement page, hit the "I Agree" button. At the next screen accept the system path default option and you can choose if you want WSJT-X as a Desktop Icon. Click on "Next>". The next window allows you to choose the Destination installation folder. I just accept the defaults here and click "Next>". Finally, you can choose if you want WSJT-X to appear in your Start Menu Folder. I just accept the default and at this point click on "Install".
On a modern PC, the installation takes just a few 10s of seconds and when complete prompts you to click "Next>". This completes the installation and you are prompted to "Finish" the installation, and to run WSJT-X.
- Set up WSJT-X
With WSJT-X running, click on the "File" menu option then from the pop-up click on "Settings".
First, we set-up the "General" tab. The important settings here are you enter your Callsign and Grid number. Enter these and press "OK" to store them.

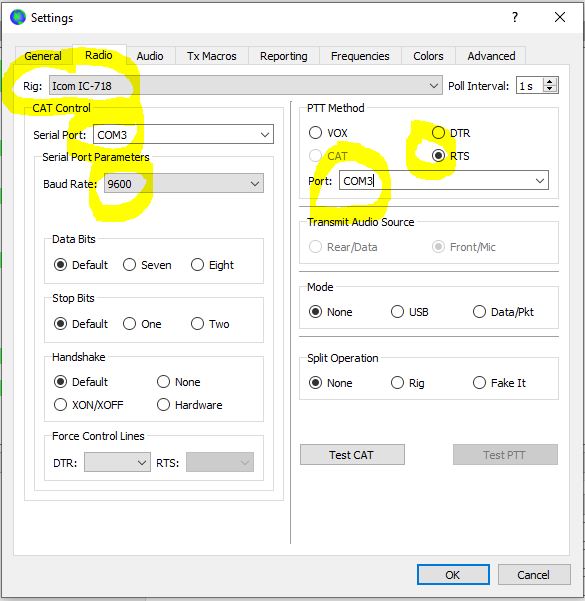
Next we will click on the "Radio" Tab to set up the CAT control. In the example below I am setting up for an Icom IC-718. There are some settings you need to get from your radio and these can be found in the radios built in menu.
If your interface does not have CAT control, you can set the Rig: to "None" in the drop down menu and ignore the settings in the CAT Control section.
- Use the drop-down menu to select the exact Rig: that you have. It is important to pick the correct model of radio here.
- In the CAT Control section, use the drop-down to enter the Serial Port: number. This is the COM port number you noted down from Device Manager.
- Still in the CAT Control section, use the Baud Rate: drop-down to match the CAT speed your radio is set to in its menu.
Now let's look at the PTT Method section. You need to select the appropriate PTT method for your interface. With our Digimode-4 you can select CAT (if your radio supports this) or COM port RTS. We generally recommend using RTS PTT. If your interface does not have CAT control or COM Port RTS keying, set the option to VOX.
- In the PTT Method section, set the Port: number to be the same as the COM port number you noted down from Device Manager.
- Still in the PTT Method section, set the PTT to RTS.
Your settings should look similar to the screen capture below.
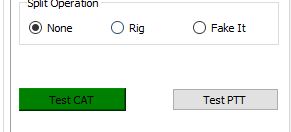
You will have noticed two buttons at the bottom of the Radio Tab called "Test CAT" and "Test PTT". Before WSJT-X has checked the CAT settings, "Test PTT" will be greyed out.
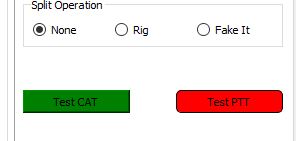
If you think all your settings are good, press the "Test CAT" button. WSJT-X will poll the radio and if it reads the frequency OK, the button will turn green (as below) and the Frequency will be updated on the WSJT Status screen.
You will also note that the "Test PTT" is now available. If you have the correct settings in the "PTT Method box" for the COM port number and RTS (or if you have chosen CAT PTT) then try pressing the "Test PTT" button.
If all is OK, the radio transmitter will fire up (with no output power) and the button will turn red as shown below. Pressing the "Test PTT" again will drop back to Rx.
At this point the CAT and PTT settings are complete.
Don't forget to press the "OK" button at the bottom to save the settings.
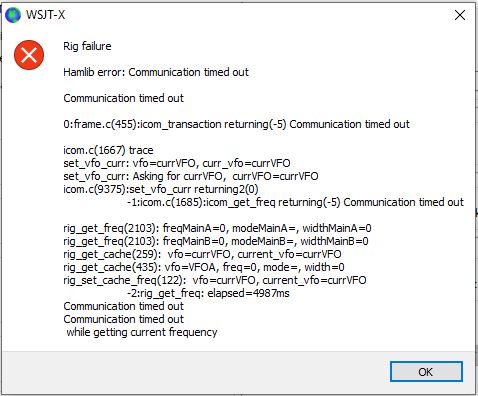
If you have any of your settings incorrect such as wrong radio type, wrong COM port number, baud rate mismatch, you are plugged into the wrong socket on the radio etc, then you will see the error below. Go back and check the settings match those in the radio and device manager etc.
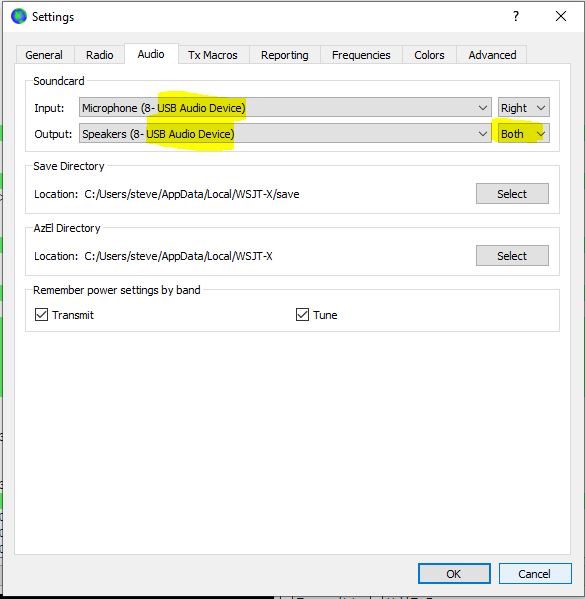
Next we click on the "Audio" tab to enter the sound card settings. The Digimode-4 interface will be the "USB Audio Device" in the "Intput:" and "Output:" drop-down menus. Choose the sound card as below. You may notice the USB Audio Device is prefixed by a number. Windows does this if it has seen more than one similar device on your PC so that you know which one is which. On the output section, Choose "Both" in the drop-down box. Your settings should look like below for a Digimode-4 interface.
Section 4 - Audio settings and levels
For the Digimode-4 interface, all the transmit and audio levels are set by a combination of level sliders in either Windows or the WSJT-X software.
- We will do Receive Audio setup first as it is the easiest.
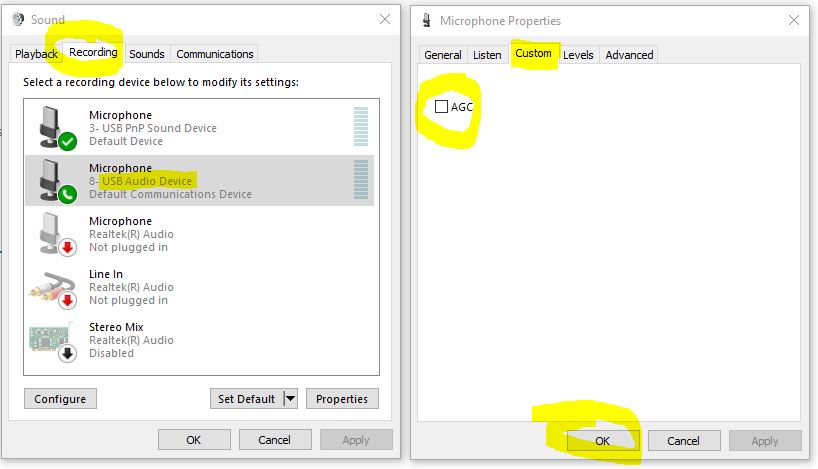
The first step is to make sure that the USB Audio Device Microphone AGC is disabled. This can cause all sorts of problems with overload and chasing your tail. From the Windows Sound Panel, check the recording properties for the USB Audio Device. In the Custom section, make sure AGC is NOT selected.
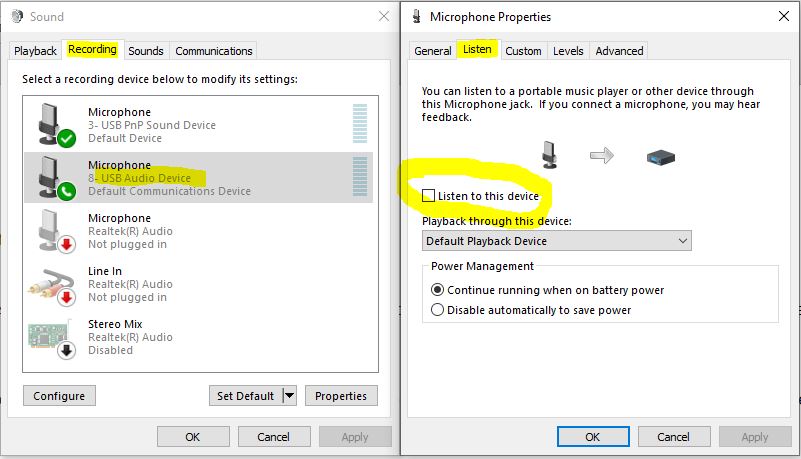
Another setting we need to check is the USB Audio Device Microphone "Listen to this device" is NOT checked. If so, this can cause all sorts of issues with feedback.
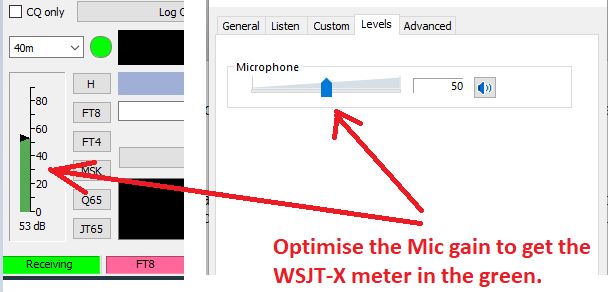
Next step whilst looking at the USB Audio Device Microphone settings, is to look in the Levels tab and optimise the level slider such that you put the receive level bar-graph in WSJT-X about mid-range. You can optimise these settings as you become more familiar with the software.
- Now we will set up the Transmit levels and there are a few things to bear in mind.
The audio level from the interface will set your transmit power. As modes such as FT8 are multi-carrier signals, if you try to generate too much power, you will crush the signals in your radio PA and this will make you more difficult to decode to a remote station. It will also make you very unpopular with adjacent operators as your signal will be so wide you will interfere with their QSO. So the trick is to keep your amplifier nice and linear and out of ALC.
I tend to stick to powers below 50W and this tends to work well.
From the Sound Control Panel, you can adjust the output level from the USB Audio Device level slider. However, in WSJT-X there is a "Pwr" slider which also adjusts the audio output and hence output power.
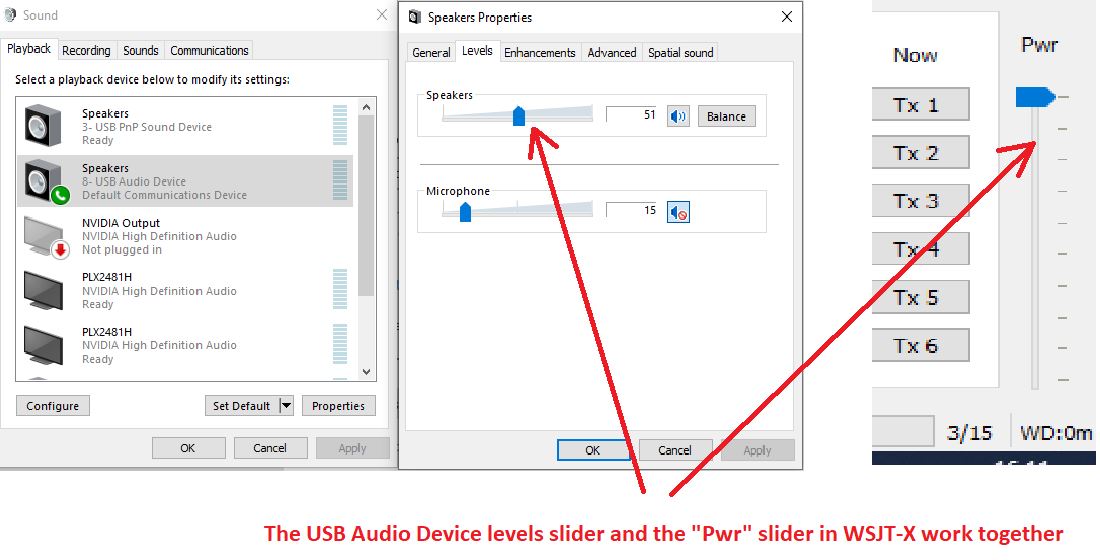
So you have two options here.
- Set the level slider in the sound control panel to 100% and then control your power from the "Pwr" slider in WSJT-X main screen.
- Set the WSJT-X "Pwr" slider to maximum and adjust the the actual power from the level slider in the sound control panel.
My preference is the first option and set my power from the "Pwr" slider in WSJT-X
My last tip on audio levels how to set your power to minimise the risk of over-driving your PA. What I tend to is adjust the output power setting on the radio. Say pick 50% power. Then whilst monitoring the transmit ALC meter, adjust the audio level "Pwr" slider until the ALC is just on the edge of operating. Then back off the audio level by 20%.
If you are running below a power you are happy with, set the output power on the radio up/down and repeat the above step.
These steps should get you a functioning setup with WSJT-X with a clean transmit signal and allow you to start exploring the software and modes.
To fully understand all the features of WSJT-X, I suggest you take a good look at the user guide here: WSJT-X User Guide